

How To Create A Website That Has Accounts
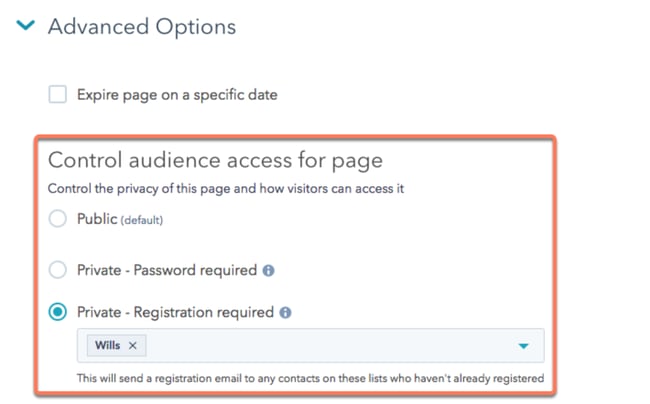
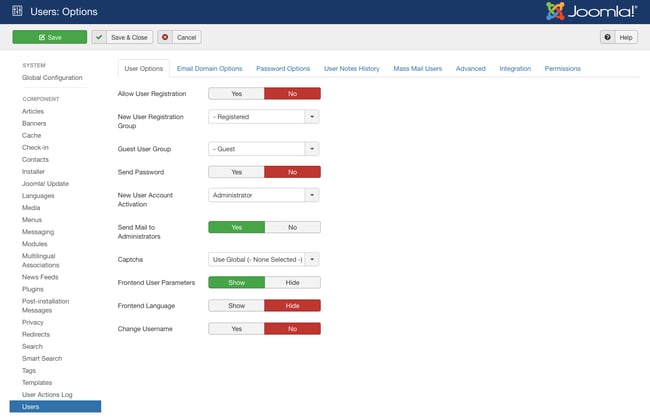
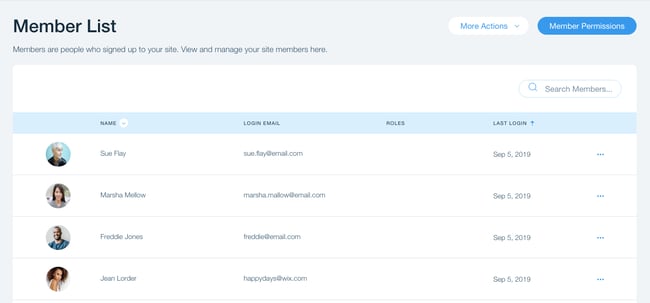
When visitors come to your website for the first time, they're not just looking to learn about your product. Ultimately, they're here to decide whether choosing your business is worth their time, money, and energy. For this reason, converting customers online requires more than just an attention-grabbing product description and a sleek homepage — your website needs to engage visitors with an excellent experience. One popular way to provide such an experience is with user accounts. Adding a user account feature might be a major change to your site's structure and functionality. Fortunately, today's website building software makes this possible in just a few clicks. In this article, I'll explain how to enable user accounts and profiles on six popular content management systems: CMS Hub, WordPress, Joomla, Wix, Drupal, and Shopify. With a user account, a visitor creates a personalized profile on your website in order to tailor their experience with your web content. Accounts empower users to access exclusive offers, contribute to a community of fellow customers, reach out to customer support, and receive content recommendations relevant to them. All of these benefits help you gain consumer trust and convert visitors into engaged leads. After all, they're called "user accounts," not "visitor accounts." Many sites can gain from providing user accounts, regardless of the product or industry. If your website... ...then you'll likely need user accounts on your website. But before you continue, consider whether it's best for your specific site to suggest or require accounts. An account should first and foremost enhance the user experience, so make sure the benefits to the customer are worth the time and effort of signing up. No one should feel "forced" to create an account when they don't need to. This is the general process for making a website with user accounts and profiles, no matter what CMS or website builder you use. Below we'll take a closer look at the process for six of the most popular platforms. If you haven't created a website yet, then you have a choice between two types of softwares. For the simplest approach to making an account-based website, choose a website builder that specializes in membership sites. See our list of thebest membership website builders and platformsfor recommendations for this type of service. If you've already built a website using a CMS, you can easily add user accounts, too. In most cases, the CMS handles the functionality of a membership site for you, either by itself or with an add-on. A user account tool should introduce features for registration, login, profile customization, and restricting content to only certain registrants. CMS Hub is HubSpot's content management system. CMS Hub fully integrates with HubSpot CRM and HubSpot's marketing, sales, and service tools. With an Enterprise account, you can limit access to website pages, landing pages, and blog content by contact list. After restricting a page to selected lists, contacts on these lists will be notified via email to register. To set up membership registration for a page in CMS Hub: Image Source For a full guide to managing user access on your HubSpot-powered website and blog, see our knowledge base article on membership registration with CMS Hub. To enable user membership on your WordPress site, a plugin is needed. There are many reputable options for WordPress website account management — here are some we recommend: They might have similar names, but be sure to consider how each plugin fits your specific needs and budget. For more WordPress plugin recommendations and some excellent examples of membership sites built with WordPress, see our guide to creating a WordPress membership site. To activate user accounts on your Joomla site: Image Source You can also toggle how to confirm membership through email confirmation or administrator approval. For more detailed instructions on enabling user registration with Joomla, see Joomla's user documentation. Wix lets administrators activate user accounts with the Members Area feature, available with any Wix plan. With a Members Area set up on your Wix site, visitors can register and view exclusive content on member pages, and administrators can easily view and manage their site members. Image Source This tool is designed for easy setup, and integrates with add-on applications for chat, blogging, events, e-commerce, and more. Learn how to set up a Members Area on Wix's support site. If you want to restrict access to content without setting up a Members Area, you can set access to specific pages based on member roles or make pages exclusive to paid members only. Drupal lets site administrators create roles for different visitors. These roles grant different permissions for viewing and creating website content. Drupal creates three roles by default: In Drupal core, you can also add additional roles specific for whoever may come to your website, and assign permissions to these roles. For example, a blog site might have a "writer" role for visitors with permission to create and publish content. To configure who can create accounts on your Drupal site and customize the registration and cancellation processes: Image Source For more complex membership site functions, Drupal relies on third-party modules. Select a well-maintained, reputable Drupal module like Membership, Drupal Commerce, and/or Rules for more hands-on control over your membership site. For guidance on installing these modules, see Drupal's instructions. To enable customer accounts in Shopify: For more help editing customer account settings on your Shopify site, including how to change your site settings on a mobile device, see Shopify's help page. Once you've set up user registration with a built-in feature or plugin, you'll need to create a registration form. This type of form will enable visitors to create a user account by filling out some basic information, like their name, email address, and a password. Next, you'll need to create a login page where users can log in after they've registered. The general process is outlined below, but the exact steps will depend on what CMS or website builder you use. Some website builders and content management systems have built-in form builders, while others require a plugin. Whatever tool you're using, you want to create a login form that provides a good user experience. Some best practices to consider are accepting login alternatives like an email address or phone number, adding a clear "Forgot password?" link, and warning users when Caps Lock is on. Next, you need to create the page where you'll embed the login form. This will become your login page. A login page should be simple and consistent with your branding. Once you've created your login page, embed the login form. This process is relatively simple on any CMS or website builder. For example, here's what the process looks like in CMS Hub: You can then customize the form's settings and the login page until you're happy with its design and functionality. The result should be as simple and sleek as Facebook's login page and form. After setting up user accounts on your website and creating a login page, be sure to test the user registration process on your site. Have yourself and others create test accounts on your website. Modify your test account profiles, modify their permissions, and check that exclusive content is actually set to exclusive. If your website is already online, consider setting it to maintenance mode while testing these changes. Temporarily hiding your site prevents any complications from new signups in this phase. Another option is to create a staging site where you can freely experiment with user accounts, while your live site stays untouched. During this testing phase, you'll want to check on the following: Did you receive a confirmation email upon signing up? If not, you'll want to ensure you've set that up. Your CMS platform may either provide an option to send a confirmation email or you can install a plugin or extension that gives you the option. Test the workflow a user would take when changing their password. If you don't receive a password change link in a timely manner, something may have gone amiss during activation. You also want to take a look at the password change email to ensure it aligns with your brand both in verbiage and design. A member area may be simple, or it may be more elaborate depending on the nature of your website. Double-check that it looks right and that it offers all the options a user needs. If you're an ecommerce brand, ensure there are options to view previous orders, change card information, and establish their shipping address. Test for mobile-responsiveness as well. If buttons are cut off or users can't get to certain sections, you'll want to tinker with the design of the membership area. We've touched upon this briefly, but make sure all exclusive content is truly exclusive to your users. If you're planning to distribute exclusive PDFs and documents, mark them with robots.txt files or noindex, nofollow meta tags so that search engines don't crawl them, and unregistered users can't find them via a site search. As an owner of a website where people give you access to their contact and card information, you'll want to ensure you have a privacy policy that protects these users from abuse. Even if you already have a privacy policy, you'll need to update it to reflect your new user section. To get started, use a privacy policy generator such as Termsfeed, Termly.io, or Shopify's. If you don't already have one, invest in an SSL certificate to ensure your website is as secure as possible. If you're not sure if you have one, use an SSL checker. This certificate changes your internet protocol from HTTP to HTTPS. In some browsers, there will be a padlock next to your URL, signifying that all the information users share with you will be kept private. Now that we've covered how to set up user accounts and profiles, how to create a login page, and how to test user accounts, let's recap what you'll need to make a website with user accounts and profiles: Whether you're running an online store, building loyalty through a membership site, or providing a home for user content with a hosting service, user accounts empower your visitors to stay engaged with your premium content and features, and help you to keep track of your customer base as it continues to grow. No matter the CMS, you're covered. Editor's note: This post was originally published in June 2020 and has been updated for comprehensiveness. 
Why Create a Website With User Accounts?
How to Make a Website With User Accounts and Profiles
CMS Hub
WordPress
Joomla
Wix
Drupal

Shopify
How to Create a Login Page for My Website
1. Create a login form using a form builder.
2. Create a login page.
3. Embed the login form on the login page.

Test Your New User Accounts
Sign-Up Confirmation Email
Password Change Workflow
Member Area Design
Exclusive Offers
Privacy Policies and Terms of Use
SSL Certificate
Things You'll Need to to Make a Website with User Logins
Grow Your Website with User Profiles

Originally published Nov 23, 2021 7:00:00 AM, updated November 23 2021
How To Create A Website That Has Accounts
Source: https://blog.hubspot.com/website/make-website-with-user-accounts
Posted by: weaverkess1936.blogspot.com
0 Response to "How To Create A Website That Has Accounts"
Post a Comment